OVERVIEW
This sample contains instructions on creating and
testing a simple “HelloWorld”
Composite with a Spring Component.
STEP-BY-STEP INSTRUCTIONS
1) Launch
Oracle JDeveloper 11g and create a new SOA Application with a name of your
choice.

2) Create
a new SOA Project within the Application with the name given below and click
Next.

3) Choose “Composite with Spring Context” and click Finish.

4) Once
you click “Finish”, the New Spring Context Dialog launches. Provide the name
given below for the Spring Context and click OK.

5) You
can now see the newly created Spring Service component within your composite.

6) Next,
create a new Java Interface for your Spring Bean. Click on File > New > General,
and Choose Java Interface.

7) Name
the interface HelloWorldInterface within the
following package.

8) If
you are asked to specify the Source Folder, choose the “src” folder as shown
below.

9) Add
one simple method within the interface named greetUser as shown below.

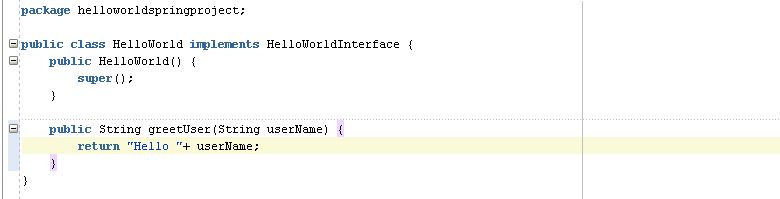
10) Next,
create a new Java Class that implements the above interface within the same
package and name it HelloWorld, as
shown below.


11) Implement
the method within the class to return a greeting message as indicated below.
12) Next,
open up the Spring Context file and define the Bean and the SCA service within.
The target attribute of the service
refers to the id of the bean. The class attribute of the bean refers to
the fully qualified name of the implementation class. The type attribute of the service refers to the interface that the
spring bean implements.

13) Open
up the Composite in the graphical mode and then drag and drop the Spring component
onto the Services swim lane. Choose to create a Web Services binding for the
component.

14) This completes the development of the composite.

15) Next,
deploy the Composite.


16) Navigate
to the EM Test Page for the Service and enter an input value for the service.
Click “Test Web Service”.
17) The
Service will respond with the String “Hello” followed by the input you
specified.

18) The
flow trace will indicate that the invocation was successful.

No comments:
Post a Comment